Showing posts with label dressmaking. Show all posts

Saturday, April 25, 2020

Upcycled kimono fabric top

I originally bought two of these pieces of kimono silk to use for my wedding dress, almost 8 years ago. The concept didn't work out and the fabrics have sat in my stash for all this time. The white piece was a gift from a friend that I have used as a scarf. I needed the extra fabric for this project though so it was time to refashion it.
https://drive.google.com/uc?export=view&id=1luqnQn3B12W9l-xW6s9_7Yk5GOfWnomY
This Simplicity pattern is a new favourite of mine
- one of the few that is generous rather than stingy with its measurements. 
There was just enough fabric to cut the top out! The front and back both have seams down the middle, but they look fine.
https://drive.google.com/uc?export=view&id=1yvPix8n0Glb_mYcIRTzxbfUJeuSxl7HG
Kimonos are made from panels of fixed-width fabric, which is why I knew that I could use the two completely different pieces.
The embroidered piece is stiff and has a lot of loose threads on the back that would catch on everything.
https://drive.google.com/uc?export=view&id=10lfN7xwsVruV5uQ2H5FqaG9xhdqs6EYi
I decided to line it with fabric from a dress that I didn’t wear because the cotton was too thin. Green is my favourite colour!
https://drive.google.com/uc?export=view&id=1fLy5HTg9bS9MTu5HM8HCx80AzaJ63U0N
It made the front bulkier but way more comfortable. It also made the seams less bulky. Time to sew the front and back together!
https://drive.google.com/uc?export=view&id=1geArTQomFqwqjWrQhnKEwhRNbmx_gsTF
The next question was sleeves or no sleeves?
https://drive.google.com/uc?export=view&id=120KP3Y4iClAWDOIKiyFnXbSxmTaa7yS-
I went with the sleeves, sewed them on and created a collar.
https://drive.google.com/uc?export=view&id=1T7S5bnSxHUwUYg34rNxOlMBftaoXWzll
I hemmed the bottom, turning the cotton to the front for a contrast. 
https://drive.google.com/uc?export=view&id=1fOJP2FslattQu8aIXxrU7ziGFqsgRsR4
Finished top!
https://drive.google.com/uc?export=view&id=1AYwc4DYLFg-5jdLbRWohrNQpT-jWdqlP
Thought about wearing to to work for frock up Friday, but the outfit was a bit much!
https://drive.google.com/uc?export=view&id=1N8BupBJ3w48ze6JWiOHA8NisYNEBZe01
#lovelypennypatterns

Tuesday, April 14, 2020

My Brother's Japanese Jacket

I lived in Japan for 9 months, and it was one of the best experiences of my life. They also have amazing textiles... so my family members all got a kimono. I regret not buying more, now that I can do all sorts of things with fabric, because I would have some amazing dresses by now! Next trip... though I'm starting to eye this one on the wall....
As he was unlikely to wear it as-is, my brother asked me to turn his kimono into a jacket.
No before picture, sorry, this post was semi-retroactive. It was a black kimono with a patterned bottom though. Phoenixes, even.
What I decided to do was unpick all of the pieces. It was a thin, silk kimono, so it wouldn't be a very warm jacket. I scoured the shops online and found a decent men's jacket that would fit my bro.
I wrapped the bottom pattern around the body of the jacket and pinned it into place
Pretty much a perfect fit!
It sounds odd, but the blacks matched really well, too, so the addition doesn't look out of place.
There was an extra motif, which I pinned to the sleeves of the jacket for extra detail.
Because of the thickness and shape of the sleeve, it was too hard to get all of this through my sewing machine. So I had to hand-sew all of it! This is the sleeve partially done:
It was going to look great when it was done!
I ran the back of the jacket through the machine- hand sewing would have taken forever!
https://drive.google.com/uc?export=view&id=1P4eI3BCsn5JQJHuT4rVq1v8qRlNgEbGl
And here it is, minus all of those pins:
https://drive.google.com/uc?export=view&id=1ogOVut64fLyZ9zWg3_Vzdwq9jqfR5Xvahttps://drive.google.com/uc?export=view&id=17684Gy7V3vI7t1N7CJeGgcyR4awumg4G

Saturday, April 11, 2020

Owl Dress

I had this fabric in my stash for a few years, waiting to find the right pattern.
https://drive.google.com/uc?export=view&id=14F_D3opq--9d656T5EMRxKVtCS1v5LZg
This dress looked interesting, and I always love things with pockets.
https://drive.google.com/uc?export=view&id=13fRLc9LteiosD8QXNf1UjltT4aOhtVK4
I had 3 metres of fabric to work with but by the time I pinned it all I ran out!
https://drive.google.com/uc?export=view&id=1kLPA0RCSmAxfBwu4-P9WJuQvqE65NLgu
The back of the top had a lovely shape.
https://drive.google.com/uc?export=view&id=1FSMuQmCxzYfdfVFeX1mJXUlOnulbARyL
But when I pinned it all together, it didn’t quite fit right - too big on top.
https://drive.google.com/uc?export=view&id=1nYePWqfRdJtCto8t95eJl715vB2qHYD8
The join between the bodice and skirt didn’t match up, off by almost 30cm.
https://drive.google.com/uc?export=view&id=1Ylm1AO4fTQZIBO0DM9ZGHQQIFIwG8yF-
I tried a number of different tucks to match them up - eventually got there after 4 more darts than the pattern called for!
https://drive.google.com/uc?export=view&id=167K2zCsoashMoj34ie1BzfmvSqaNqmOH
It was finished off with large pearl buttons.
https://drive.google.com/uc?export=view&id=10RF5cfggmznmfSdX6mF3cWI9YOQT03_b
And there it is - the owl dress!
https://drive.google.com/uc?export=view&id=1Xfw9xGp0krBPa91R8OhwewjzNptmesmL
https://drive.google.com/uc?export=view&id=1QgEeQbowYH9whVCFqJ_9ZI27722NnHBK

Friday, January 10, 2020

Gone Batty at the Show Dress

I spend some time at our local show each year, but instead of buying a show bag I get.... fabric! Of course 😆 
This is from a couple of years ago now, but I finally made it up.
Bring on my favourite dress pattern and it was just a matter of cutting everything out (and hoping that I had enough fabric). 
I wanted to try a different neckline, too, maybe an asymmetrical one to match the quirky pattern?
Isn't it a great pattern? I overlaid some of the pieces to make the skirt slimmer and also to preserve some of the bats whole. I'm still playing with this pattern to make it fit me.
Then I made the mistake of putting the project aside after I cut it out, caught up in something else. I pulled the pieces out a couple of months later, sewed it all together... and when I tried to put it on, I found that it was waaaaay too small.
Puzzled, I dutifully cut out two new pieces for the back and sewed the zip in without looking at it properly. The result was this:
Sure, it fit better, but that much bra shouldn't have been flashing. Grumpy, I set it down and decided to tidy my work space... in which time I found the two missing pieces that I had cut out!
Bah! Ah well, I'll use those pieces in some other dress I suppose! A bit of tweaking and the dress fit well. I played with some pieces for the back and landed on this:
I've seen a lot of cute patterns recently and wanted to cut a bat-shaped pocket out, too. 
I found some red cotton to use as a backing, sewed around the edges and turned it through. 
It worked out pretty well!
 All in all, the disaster turned into a pretty groovy dress.
It's one of my favourite outfits now. I plan to wear it later this month to give a presentation at a conference in Sydney - show off a little bit of the Territory. 

#lovelypennypatterns

Tuesday, July 2, 2019

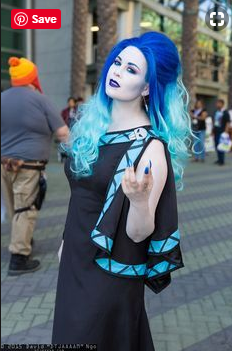
Hades (from Hercules) Cosplay

The next local nerd convention is fast approaching and I'd been thinking of what my cosplay was going to be. Looking up the guidelines and noting the prizes this year gave me extra incentive as well!
Merida from Disney's Brave had been on my to-do list, but instead I decided to continue with my Disney villains stint and do Hades from Hercules.

Outfit

The question was, how did I want to make the dress? Hades wears a two-piece, with an under-shirt and toga over the top: not so flattering for a woman, generally.
I have my favourite dress pattern, so rather than stuff up something made from scratch I went with it again:
But there will be some adjustments. I like the sleeve detail from this Hades cosplay version:
And this version, where the neckline is very feminine.
And the front drape from this one:
My sketch ended up something like this:
I had some leftover grey silk for the single shoulder, and found some black cotton in the bottom of a box for the rest of the dress. I'm still trying not to buy new fabric, instead re-using what I have.
 Planning the diagonal look on the front. I pinned it wrong the first time, had to swap directions!
 The final dress would look something like this:
I debated painting the pattern onto the trim. 
But decided I would use the scraps of black that I had leftover instead. This dress was made entirely from leftovers - I didn't buy any new fabric! 
My husband said that the fabric lines gave it more visual presence, which is good. 
It was really starting to look like the real thing at this point!  
A size trial and I discovered that it needed to be taken in under the arm, but still pretty good!  

Accessories

I ducked out to Bec's Costume Box at lunch one day, my all-time favourite cosplay shopping spot, to have a look for my wig. Did I want stand-up hair like the male Hades? Or curls? I definitely didn't want straight hair. I settled on this:
Onto the jewellery - aren't I lucky to have a friend who works with clay! We sat down one afternoon and she produced beautiful earrings, and I produced my rough brooch, earrings and necklace.

Then I managed to paint them myself, and I'm happy enough with the results. The brooch, on the right below, is bigger than I expected! I need to put felt on the back and a big clip so that it will attach. Who says the lady of hell can't have some frills?
I was thinking black gladiator sandles for my feet, but my friend suggested heels for some imposing height. I found the perfect shoes in town, and they were on sale!
Next? Makeup! A bit of a trial for turning myself grey. Black lips, very simple eyes. Disney characters are pretty 2D!
I needed to be grey all over. To prevent overuse of paint, I bought some grey tights for my legs. My arms, neck and shoulders had to be done though.
Final dress, hair and accessories below!
Can't wait to get all dressed up on the day!
#lovelypennypatterns